Tableau Server is an indispensable tool for organizations that rely on data-driven decision-making. It allows users to publish, share, and collaborate on data visualizations securely and efficiently. However, to maximize the benefits of Tableau Server Techniques, it is essential to customize views and permissions to meet the unique needs of your organization. In this blog, we will explore the importance of customization, delve into the mechanics of customizing views, and provide a step-by-step guide to managing permissions effectively.

Why Customize Views and Permissions ?
1. Enhancing User Experience
Customizing views ensures that users can access relevant insights without wading through extraneous data. A personalized interface improves usability and fosters better engagement.
2. Ensuring Data Security
Properly configured permissions safeguard sensitive information. By granting the right level of access to the right users, you reduce the risk of unauthorized access and data breaches.
3. Facilitating Collaboration
Tailored permissions enable team members to work together efficiently, ensuring that everyone has access to the tools and data they need without compromising security.
4. Regulatory Compliance
For organizations in regulated industries, customizing permissions helps ensure compliance with data protection laws by restricting access to sensitive data. (Ref: Tableau Pie and Donut Charts: For a Stunning Visualizations)
Customizing Tableau Views
1. Understanding Views in Tableau Server Techniques
In Tableau, a view refers to a specific visualization or dashboard that has been published to Tableau Server Techniques. Users can interact with these views, apply filters, and drill down into details to explore data.
2. The Role of Customization
Customizing views allows users to:
- Save filter settings.
- Adjust visualization layouts.
- Highlight specific data points.
These customizations enhance the relevance and usability of the dashboard for individual users or groups.
3.Step-by-Step Guide to Customizing Views
a. Personalizing Default Views
- Navigate to the Desired View: Open the Tableau Server Techniques or Tableau Cloud and access the dashboard you want to customize.
- Apply Filters: Use the filter options to select the specific data you need.
- Save Custom View:
- Click the “View” menu on the Tableau toolbar.
- Select “Save Custom View.”
- Name the custom view and decide whether to make it the default view for yourself or share it with others.
b. Embedding Views
Embedding Tableau views into web portals or applications enhances accessibility and encourages broader usage. To do this:
- Copy the Embed Code:
- Navigate to the desired view.
- Click the “Share” button and copy the embed code.
- Integrate into External Platform: Paste the code into your web application or intranet site.
c. Creating Dynamic Filters
Dynamic filters allow users to interact with data in real time. For example, a sales dashboard can use a dynamic filter to display data for specific regions or time periods.
- Add a Filter to Your Dashboard: Drag a field from the data pane to the Filters shelf.
- Publish the Dashboard: Ensure that the filter options are enabled for user interaction.
Managing Permissions on Tableau Server Techniques

1. Understanding Permission Levels
Permissions in Tableau Server Techniques determine what users can see and do with data and content. These permissions can be set at various levels, including:
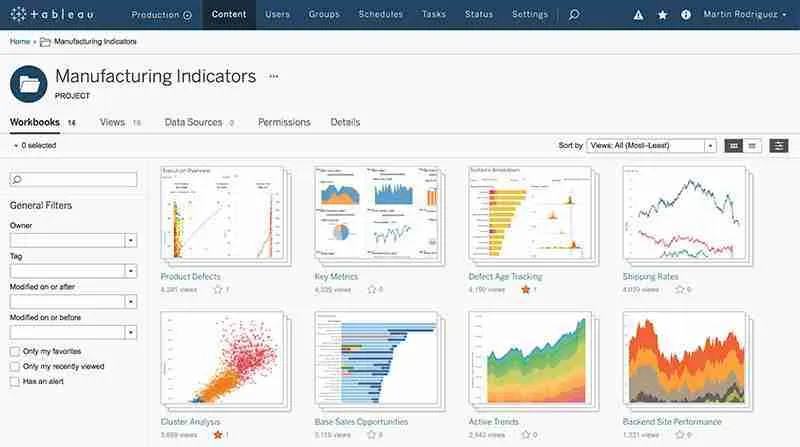
- Workbook: Controls access to a specific workbook.
- View: Restricts access to individual views within a workbook.
- Project: Applies permissions to a collection of workbooks and data sources.
2. Key Permission Capabilities
Permissions in Tableau Server Techniques can be divided into four main categories:
- View: Access to view content.
- Interact: Ability to interact with filters, parameters, and data in dashboards.
- Edit: Permission to modify content.
- Manage: Full control over content, including the ability to delete or move items.
3. Step-by-Step Guide to Customizing Permissions
a. Setting Permissions for a Workbook
- Navigate to the Workbook: Open Tableau Server Techniques and locate the workbook you wish to manage.
- Open Permissions:
- Click on the options menu (ellipsis) next to the workbook.
- Select “Permissions.”
- Add Users or Groups:
- Click “Add a User/Group” and search for the desired users or groups.
- Assign Roles:
- Choose from predefined roles (Viewer, Editor, Administrator) or create a custom role by toggling individual permissions.
b. Using Project-Level Permissions
To simplify permission management, apply permissions at the project level:
- Navigate to the Project: Locate the project folder in Tableau Server Techniques.
- Edit Permissions: Open the project’s permissions settings.
- Lock Permissions:
- Locking permissions ensures that all workbooks and views within the project inherit the same settings.
- Click the “Lock Content Permissions” option if uniform permissions are required.
c. Implementing Row-Level Security
Row-level security (RLS) restricts data access at a granular level, ensuring users can only view data relevant to them.
- Create a User Filter:
- In Tableau Desktop, create a calculated field using the
USER()function. - Example:
IF USER() = [Region Manager] THEN [Region] ELSE NULL.
- In Tableau Desktop, create a calculated field using the
- Publish with Permissions:
- Publish the workbook to Tableau Server Techniques and ensure that the user filter is active.
d. Auditing Permissions
Regularly review and audit permissions to ensure they align with organizational requirements:
- Use the Tableau Permission Audit Tool: Available as part of Tableau’s Admin Insights, this tool provides a comprehensive view of user permissions.
- Check User Access:
- Use the “Who Has Access” feature to identify which users can view specific content.
Best Practices for Managing Tableau Server Techniques
1. Implement Role-Based Access Control (RBAC)
Define roles such as Viewer, Editor, and Administrator, and assign permissions based on these roles rather than individual users. This approach simplifies management and ensures consistency.
2. Document Your Permissions Structure
Maintain a record of permissions settings for easy reference and troubleshooting.
3. Train Users
Provide training to ensure users understand how to utilize custom views and navigate permissions effectively.
4. Regularly Review Permissions
Schedule periodic reviews to ensure that permissions align with changing roles and responsibilities within the organization.
5. Use Groups Instead of Individual Users
Assign permissions to groups rather than individual users to streamline management and reduce errors.
Final Thoughts
Customizing Tableau Server views and permissions is a powerful way to enhance the user experience, improve data security, and streamline collaboration. By following the strategies and steps outlined in this guide, you can tailor Tableau Server to meet the specific needs of your organization. Whether you’re personalizing dashboards, embedding views, or implementing row-level security, these customization techniques will help you get the most out of Tableau Server while safeguarding your data assets.


